| ||||||||||||||||||
IntroductionThis project is a small demo to show how VC++ can be used for localization of existing products. Windows 2000 is the suggested OS, as it was completely built on Unicode, and though NT was built on Unicode too, using its full capabilities is difficult. Visual Studio and Visual C++ were used to implement this tool. Japanese language is used as an example to implement the case. OverviewBefore we get our hands dirty, let us understand the distinction between Internationalization and Localization. Internationalization versus LocalizationFor the software development process, internationalization means to prepare an application so that the code does not need to be modified each time an additional language is to be displayed. Separate files contain all of the translatable information. Localization of an application means to change it to be able to handle a particular language and locale. To localize a program that has already been internationalized involves no changes to the source code. Instead, translatable files are sent to the product or a contractor translation agency for modification. For a system to support multiple languages, we need to:
Setting up Windows 2000 or XPStep 1: Install the Japanese language pack. Navigate to Start menu->Control Panel->Regional Options->General. Once in the General tab, check the check box left to the Japanese language from the language settings for the System tab.
Step 2: Setting the input locale. Navigate to Start menu->Control Panel->Regional Options->Input Locale. Under the Installed Input Locales section, click Add. From the Input Locale drop down list, select Japanese, and for the Keyboard Layout/IME drop down box, select Japanese Input System (MS-IME2000).
Step 3: Setting the default locale. In the Control Panel - Regional Options, under the General tab, scroll down the list for Language Settings for the System. Highlight Japanese, and click Set Default. Once done, verify it did not change your Input Locale default input language. Click OK.
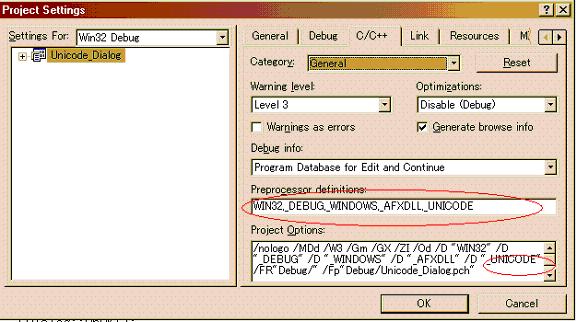
Setting up Visual C++ for Unicode compilationStep 1: To Unicode enable a project in VC++: in the VC++ IDE, navigate to Project->Settings->C++, in the Preprocessor definitions section, insert
Once The first thing you need to understand is that the use of a From MSDN:
Step 2: Navigate to the Link tab and select Output in the drop down list in the Category section, and specify Hurry !!! Now, we are all set to build a small application with a dialog box which accepts Japanese language codes and outputs the same text in the output window. Implementation// I am trying to collect stones from the ocean of knowledge... // Today I learnt it how to extract unicode information from // edit box which is not supported by MFC but taken help from // win32 SDK function, named ::GetWindowTextW() void CUnicode_DialogDlg::OnOK() { // TODO: Add extra validation here USES_CONVERSION; CWnd *pWnd="GetDlgItem(IDC_EDIT_UNICODE); LPWSTR lpString = new WCHAR[MAX_PATH]; ::GetWindowTextW(pWnd->m_hWnd, lpString, MAX_PATH); LPWSTR caption = A2W("Caption"); HWND hWnd = this->m_hWnd; MessageBoxW(lpString, caption, MB_OK ); // free the string delete[] lpString; CDialog::OnOK(); } // ******************************* // Further reading
Locale
Locale programmingProsThe Operating System is responsible for loading the language specific resources. ConsThis project does not demonstrate the conversion of the file dialog and the titles in the application as this is all part of the Windows Common Dialog library. | ||||||||||||||||||
출처: http://www.codeproject.com/KB/locale/Unicode_Edit_Box.aspx?display=Print


