출처: http://www.permadi.com/tutorial/jsEventBubbling/index.html

Background

The term event refers to something that happens to elements (by elements, we mean html elements such as <table>, <form>, <button>, or <div> ). For example, when clicking a <button>, there are several events taking place: mouse button being pushed, mouse button being released, and a html button being clicked.

Events are sent as notifications to JavaScript. When event occurs, they are being fired. JavaScript can intercept events by overridding the event handlers.

For example, to catch onclick events on this button:

<input type="button" value="Button"/>

Then one way to do it is like below (this particular example, when we intercept the event, we show an alert box saying "button clicked"):

<input onclick="javascript:alert('button clicked');return true;"
  type="button" value="Button"/>

Events can also be intercepted to trigger a function call. For example, below, the same onclick event triggers the handleOnClick function which we created somewhere else on the html page.

<script language="javascript">
  function handleOnClick()
  {
    alert(this);    
  }
</script>

[other html ....]

<input onclick="handleOnClick" type="button" value="Button"/>

The other two events can be intercepted, too. For example, the button below intercepts onmousedown, onmouseup, and onclick:

<input
  onclick="javascript:alert('button clicked');return true;"
  onmousedown="javascript:alert('button down');return true;"
  onmouseup="javascript:alert('button up');return true;"
  type="button" value="Button"/>

Notice that there are a sequence of order of the events: onmousedown, onmouseup, then onclick. The order could be important on some programming purposes.

Default Event Handler And Return Value

By assigning an event handler like above, our handler will be called before the default (built-in) event handler is called. Ont thing that often gets overlooked is the return value. This value is important in some sitations because that value determines whether the default event handler is called or not.

Returning false tells the default event handler to be skipped. Returning true tells the event-chain to continue (meaning the default event handler will be called). If no return value is specified, true is assumed.

To see the effect, see this example. The first text-field returns true and the second one returns false. Notice that by returning false, the default event handler is not called, and thus you cannot type onto the second text-field (this is useful for form validation, for example if user typed an alphabet into a phone number, you can reject it right away by returning false).

<input onkeydown="javascript:return true;" type="text" name="textfield" />
<input onkeydown="javascript:return false;" type="text" name="textfield" />


This return value may be useful (for example during in form validation, if the user's input is valid, we can just return true to let the default event handler take over).

Another frequent technique is to assign a script to a link without returning anything like the first example below. Click the two links below and see how they behave differently.

<a class="contentlink" href="#" 
onclick="javascript:alert('do something');"> <a class="contentlink" href="#"
onclick="javascript:alert('do something');return false;">

Click here to execute a JavaScript function and retuning nothing (true)

Click here to execute a JavaScript function and retuning false

On the first link, the default handler is called. Since nothing is returned. The default handler tries to jump to the anchor, which cause the anchor (#) to be appended in the browser bar (and possibly the html page to be scrolled to the top).

The second one does not do that because we return false to stop the default handler. In most cases, the later is what we really want so it is a good idea to pay attention to this return value.

Event Capturing And Bubbling

There are three phases that every event travels in the event chain: capturing phase, target phase and bubbling phase. Event capturing phase is when event is being sent from the container all the way down to the target element. Event bubbling refers to the way events are propagated upward to its ancestors after it reaches its target element. Target phase is when the event actually is being sent to the target element that originated the event.

Consider the button below, contained within a <form> contained within <body>.

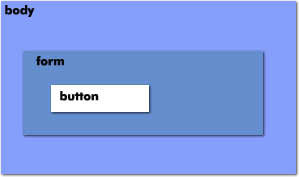
The capturing phase goes the root element, all the way to <button>.

When it reaches the button, that is the target phase. The bubbling phase goes in the opposite direction. After the event reaches the target (buttton), it goes back all the way to the top ancestor.

All the major current browsers supports the bubbling phase model, but some do not support the capturing phase. We will discuss event capturing more when discussing addEventListener() below.

to demonstrates event bubbling, we assign an onclick for every element in the following example. Click the button and you will see the event propagates up to its parents. Even though you only clicked the button, its ancestors also receive the event:

<body onclick="javascript:alert('body clicked');">
  <form onclick="javascript:alert('form clicked');">
<input onclick="javascript:alert('button clicked');" name="Button" type="button"> </form>
</body>

Open this page and click the button to try. You will see alert boxes in the order of the event received: the "button clicked" message, then "form clicked," then "body clicked."

This can be useful as we see in the example later, but it can also be undesirable to keep the bubbling on some situations. There's a way to break the bubbling-chain by setting the cancelBubble property of the event object to false.

event.cancelBubble=false;
Modifying our example and setting cancelBubble to false in the button:
<body onclick="javascript:alert('body clicked');">
  <form onclick="javascript:alert('form clicked');">
<input onclick="javascript:alert('button clicked');event.cancelBubble=false;"
name="Button" type="button"> </form>
</body>
Open this page and click the button to see how the event stops propagating and no longer triggers the parent event handlers.

For completeness, we're going back to capturing phase. The recommended method of event handling by DOM3 standard is to use addEventListener() method.

addEventListener(event string, 
listener (function or an Object implementing EventListener),
useCapture);

Where useCapture is a boolean value that indicates that the event of the specified type (example: "click" event) to be sent to the designated listener by the designated element during the capture phase (refer to the diagram above). Son that in this example below, the body will receive the notification before the event reaches the button:

document.body.addEventListener("click", function(){alert("body clicked");}, true);
document.getElementById("button").onclick=function(){alert("button2 clicked");

Try it here.

If the useCapture event above is set to false, then the event will be sent to the listener during the bubbling-phase, which means button will fire first before body.

The bad news is addEventListener() is currently not supported in Internet Explorer 7. In IE, you need to use this instead (which lacks the last parameter):

attachEvent(event string, 
listener (function));

I won't discuss this further But see an intersting effect of the useCapture parameter here (assuming you use Firefox 2 which supports addEventListener()):

<script language="javascript">
if (document.body.addEventListener)
{
document.body.addEventListener("click",
function(){alert("body clicked");}, true); document.getElementById("form").addEventListener("click",
function(){alert("form clicked");}, true); document.getElementById("button").addEventListener("click",
function(){alert("button clicked");}, true); } </script>

Try the example.

<script language="javascript">
document.body.addEventListener("click",
function(){alert("body clicked");}, false); document.getElementById("form").addEventListener("click",
function(){alert("form clicked");}, false); document.getElementById("button").addEventListener("click",
function(){alert("button clicked");}, false); </script>

Try the example .

In the first example, the event are received in the following order: body, form, then button. In the second example, they are in opposite order: button, form, body. Do you see why this is from examining the direction of the captuing and bubbling phase?

AND

출처: http://blog.jidolstar.com/455

Adobe Flex를 접할때 어려워하는 부분중에 하나가 Event입니다.
깊숙히 이해하려고 할때 잘 이해가 안되는 부분이 많은게 이벤트죠.

기본에 충실해야한다!


프로젝트(http://starpl.com)를 하면서 많이 느꼈습니다.


처음 Flex 접했을때 가장 어려움을 겪었던 것은 기본이 탄탄하지 못한 것으로부터 였습니다.


그래서 Flex와 함께 ActionScript 3.0의 기본 문법 및 대략적 내용을 이해해야한다고 생각합니다.


단순한 문법뿐 아니라 분석/설계에도 관심을 가지고 공부해서 명확하고 깨끗한 프로그램을 만들 수 있도록 노력해야겠구요.


아래는 Event에 대한 질문을 걸어놓고 스스로 답변까지 해두었습니다.
이것으로 Event 전부를 설명할 수 없지만 몇가지 궁금한 사항을 이해하는데는 도움이 될겁니다.


그냥 읽고 지식만 얻어가지 마시고 없는 질문이 있다면 스스로 질문/답변을 댓글로 달아주시면 더욱 고맙겠습니다. 잘못된 내용이나 추가해야한다는 것도 포함합니다.


1. ActionScript 3.0 이벤트(Event)

1.1 ActionScript 2.0과 3.0에서 이벤트가 바뀐점은?

  • ActionScript 2.0에서는 이벤트 리스너를 추가하는 경우 상황에 따라 addListener() 또는 addEventListener()를 사용하지만 ActionScript 3.0에서는 항상 addEventListener()를 사용합니다.
  • ActionScript 2.0에는 이벤트 흐름이 없으므로 이벤트를 브로드캐스팅하는 객체에서만 addListener() 메서드를 호출할 수 있지만 ActionScript 3.0에서는 이벤트 흐름에 포함된 모든 객체에서 addEventListener() 메서드를 호출할 수 있습니다.
  • ActionScript 2.0에서는 함수, 메서드 또는 객체를 이벤트 리스너로 사용할 수 있지만 ActionScript 3.0에서는 함수 또는 메서드만 이벤트 리스너로 사용할 수 있습니다.
  • on(event) 구문은 이제 ActionScript 3.0에서 지원되지 않으므로 ActionScript 이벤트 코드를 무비 클립에 첨부할 수 없습니다. 이벤트 리스너를 추가할 때는 addEventListener()만 사용할 수 있습니다.

1.2 Event를 사용해야하는 이유? 2가지 이상

  • 객체간 강한 결합 해결 : 애플리케이션 설계시 Callback함수를 사용하는 등의 강한결합을 이용하는 경우 유지보수 및 확장이 어려워지는 경우가 크다. 이벤트는 객체간 느슨한 결합을 해주는데 큰 힘을 발휘할 수 있다.
  • 작업에 대한 일관성 없는 응답 : 동기적 방식과 비동기적 방식에 대한 응답에 대한 처리를 이벤트를 사용하지 않는 경우 서로 다른 방법을 선택해서 사용해야한다. 이벤트는 1가지 방법으로 응답처리를 가능하게 해준다.


2. Event의 구성요소 3가지는 무엇이고 의미를 설명하라.

  • 이벤트 객체(Event Object)
    flash.net.Event의 객체나 이를 확장한 이벤트 객체를 의미한다. 이벤트 객체에는 이벤트에 대한 정보가 들어가있다. 이벤트의 종류(Type)과 이벤트를 발생한 객체(target)에 대한 정보가 포함된다.
  • 이벤트 발생자(Event Dispatcher)
    이벤트를 발생(broadcast)하는 객체이다. 이벤트 객체에 target으로 이벤트 발생자 정보가 담긴다. flash.net.EventDispatcher를 확장한 모든 객체는 이벤트 발생자가 될 수 있다. EventDispatcher의 dispatchEvent() 메소드에 이벤트 객체를 담아 실행하면 이벤트가 발생하게 된다.
  • 이벤트 청취자(Event Listener)
    일종의 메소드 또는 함수이다. 발생한 이벤트를 듣는 역할을 한다. EventDispatcher클래스를 확장한 클래스의 객체에서 addEventListener()을 이용해 이벤트 청취자를 등록할 수 있다. addEventListener()을 이용하면 청취할 이벤트의 종류(type)을 결정할 수 있으며 청취할 이벤트 흐름(capture,target,bubbling) 및 우선순위등을 선택할 수 있다.

3. Event Listener를 등록/삭제하는 방법을 기술하라.

  • 등록
    EventDispatcher의 addEventListener() 메소드를 이용한다.
    예)
    var button:Button = new Button();
    button.addEventListener( MouseEvent.CLICK, onClick, false );
    public function onClick( event:MouseEvent )
    {
      trace( event.type, event.target  );
    }
  • 삭제
    EventDispathcer의 removeEventListener() 메소드를 이용한다.
    예)
    button.removeEventListener( MouseEvent.CLICK, onClick, false );
    3개의 인자가 addEventListener()를 사용할때와 같아야 정상적으로 이벤트 청취자 등록이 삭제된다.
    참고로 맨 마지막 인자는 useCapture이다.

4. Event 전파단계의 종류 3가지가 무엇이며 각각에 대한 설명

  • 이벤트 전파단계의 종류 : 캡쳐(capture) 단계, 타겟(target) 단계, 버블(bubble)단계
  • 이벤트 전파 순서 : 캡쳐->타겟->버블
  • 캡쳐 단계
    루트(root) 디스플레이 객체서부터 이벤트를 발생한 객체(target)까지 디스플레이 객체 리스트(display Object List)를 따라 검색해나가는 단계이다. 즉, 부모->자식으로 이벤트를 전파한다. 이 캡쳐 단계에 이벤트를 청취하기 위해서는 addEventListener()의 3번째 인자인 useCapture가 반드시 true로 되어야 한다. false로 되어 있다면 캡쳐단계가 아닌 타겟과 버블 단계에서 이벤트 청취를 한다.
    캡쳐단계 청취하는 목적은 다양할 수 있다. 가령 중간에 이벤트 전파를 중지시킬때 필요할 수 있다. 이해가 안될 수 있지만 실제 프로젝트를 하면 이런 경우가 다분하다.
    사용 예 )
    button.addEventListener( MouseEvent.CLICK, onClick, true );
  • 타겟 단계
    갭쳐 단계 이후 타겟단계에 도달한다. 타겟 단계는 이벤트를 발생시킨 객체까지 도달했을때 이뤄진다.
  • 버블 단계
    타겟 단계 이후 다시 루트(root) 디스플레이 객체로 이벤트가 전파되는 단계이다. 버블버블 물망울이 수면위로 다시 올라가는 것을 연상하면 되겠다. 캡쳐와 반대로 자식->부모로 이벤트가 전파되는 단계이다.
    이벤트가 버블 단계로 전파되기 위한 조건은 이벤트 송출시 Event의 생성자 인자값중 bubble값을 true로 설정되어 있어야 한다. MouseEvent같은 경우 이 bubble값이 true로 설정되어 있다.
    타겟단계와 버블단계에 이벤트 청취자를 등록하기 위해 addEventListener()의 3번째 인자 useCapture가 false로 되어야 한다. useCapture를 설정하지 않으면 기본값이 false이다.
  • 이벤트 객체가 전파되는 기능이 굳이 필요한 이유
    부모-자식1-자식2….-자식100 의 형태로 디스플레이 객체 리스트가 형성되어있다고 가정하자 자식50에서 자식 100을 마우스 클릭했을때 이벤트를 받고 싶다고 하자. 자식50은 자식100의 존재유무를 모른다(알 수 있지만 알게되면 강한결합이 일어난다.) 이런 경우 이벤트 객체가 전파되는 기능은 매우 유용하게 쓰일 수 있다. 캡쳐나 버블 단계에서 자식50은 자식100에서 발생된 이벤트를 받을 수 있다.
  • flash.display.DisplayObject 클래스는 EventDispatcher를 확장해서 만들어졌다는 것에 주목하자.

5. 4번의 Event 전파는 어떤 환경에서 가능한가?

  • 반드시 디스플레이 객체 리스트(Display Object List) 상에 존재하는 디스플레이 객체(Display Object)여야 이벤트 전파가 가능하다. 그 외의 이벤트 전파는 타겟 단계밖에 없다. 가령, HTTPService나 URLLoader에서 이벤트가 발생하는 경우 이들은 디스플레이 객체가 아니다.
  • 이벤트 전파의 조건
    1. 디스플레이 객체여야 한다.(flash.display.DisplayObject를 확장한 클래스의 객체)
    2. 디스플레이 객체는 디스플레이 객체 리스트에 존재해야 한다. 즉, stage로 부터 addChild되어 있어야 한다.

6. 이벤트 전파시 target과 currentTarget의 차이점은 무엇인가? 예를 들어 설명하라.

  • target은 이벤트를 발생한 객체이고 currentTarget은 이벤트를 청취하는 객체이다.
  • 예시)
    var p:Sprite = new Sprite(); //parent
    var c:Sprite = new Sprite(); //child
    addChild( p );
    p.addChild( c ); //c가 p의 자식인 것에 주목
    p.addEventListener( MouseEvent.CLICK, onClick ); //이벤트 청취를 p가 하는 것에 주목!
    public function onClick( event:MouseEvent )
    {
    trace( event.target, event.currentTarget ); //c를 클릭했을 경우 c, p가 나오고 p를 클릭했을 경우 p,p가 나온다.
    }

7. Event 우선순위에 대해서 간단한 예제를 들어 설명하라.

  • 이벤트 우선순위는 구체적으로 이벤트 청취 우선순위라고 할 수 있다.
  • 이벤트 청취 우선순위는 addEventListener()의 4번째 인자인 priority를 이용한다. 이 값이 클 수록 청취 우선순위가 높아지며 addEventListener()의 등록 순서에 상관없이 우선순위에 따라 이벤트 리스너가 호출된다.
  • 이벤트 청취 우선순위가 유효한 조건
    1. 같은 객체에서 청취한다.
    2. 같은 이벤트 종류(type)을 청취한다.
    3. 같은 useCapure 값을 가진다.
  • ex)
    a.addEventListener(MouseEvent.CLICK, aHandler, false, 3);
    a.addEventListener(MouseEvent.CLICK, bHandler, false, 1);
    a.addEventListener(MouseEvent.CLICK, cHandler, false, 100);

    a객체에 MouseEvent.CLICK 이벤트가 발생시 등록순서에 상관없이 priority값이 가장큰 cHandler가 먼저 호출되고 다음으로 aHandler, bHandler가 호출된다.

8. Event 전파를 중단하는 메소드 2개가 무엇이며 간단한 예제를 들어 각각의 차이점을 설명하라.

  • Event 클래스의 stopPropogation()와 stopImmediatePropogation() 메소드이다.
  • 차이점
    - stopPropogation()
      이벤트 전파를 중단하되 같은 노드의 이벤트를 청취까지는 허락한다.
    - stopImmediatePropogation()
      이벤트 전파를 즉시 중단한다.
  • 예제
    back이 배경 canvas이고 button1이 back에 포함된 button일때
    back.addEventListener(MouseEvent.CLICK, event1Handler);
    back.button.addEventListener(MouseEvent.CLICK, event2Handler);
    back.button.addEventListener(MouseEvent.CLICK, event3Handler);
    back.button.addEventListener(MouseEvent.MOUSE_OUT, outHandler);private function event1Handler(e:MouseEvent):void
    {
           trace(’back’);
    }
    private function event2Handler(e:MouseEvent):void
    {
           trace(’button’);
           e.stopPropagation();
           e.stopImmediatePropagation();
    }
    private function event3Handler(e:MouseEvent):void
    {
           trace(’button2′);
    }
    private function event1Handler(e:MouseEvent):void
    {
           trace(’out’);
    }

    e.stopPropagation(); e.stopImmediatePropagation(); 두가지 다 없을경우
            button
            button2
            back
            out
    e.stopPropagation(); 만 실행
            button
            button2
            out
    e.stopImmediatePropagation(); 만 실행
            button
            out

9. addEventListener의  useCapture 인자는 무엇을 의미하는가? 간단한 예제를 들어 설명하라.

  • 이벤트 전파를 청취할때 캡처단계를 청취할지 타겟 및 버블 단계를 청취할지 결정하는 인자이다.
  • 모든 전파 단계에서 청취하기 위해서는 useCapture가 다른 2개의 addEventListener()를 사용해야한다.
  • 예제 생략

10. Sprite, Shape와 같은 클래스에서 어떻게 하면 이벤트를 송출할 수 있는가?

  • dispatchEvent() 메소드를 호출하면 된다.

11. Sprite, Shape와 같이 이벤트 송출할 수 있는 클래스는 근본적으로 어떤 클래스를 상속받았기 때문에 가능한가?

  • Sprite와 Shape는 궁극적으로 DisplayObject를 확장해서 만들어졌으며 DisplayObject는 EventDispatcher를 확장했다. 그러므로 Sprite와 Shape와 같은 클래스는 EventDispatcher의 메소드를 전부 사용할 수있다. 이중에 dispatchEvent()도 사용할 수 있다.

12. IEventDispatcher는 무엇이며 어떤 경우에 이것을 사용해야할까?

  • EventDispatcher의 인터페이스이다.
  • IEventDispatcher를 활용하는 것은 다중상속이 불가능한 AS3에서 유용하다.
    가령, 어떤 클래스가 ProxyObject를 확장해서 만들어져야한다. 그런데 이 클래스는 이벤트도 발생시켜야 하므로 EventDispatcher클래스도 확장해야한다. ActionScript 3.0은 다중상속을 지원하지 않는다.(다중상속은 이점도 있지만 단점도 있다.) 그러므로 이러한 경우에는 주가 되는 클래스인 ProxyObject를 is-a 확장을 하고 EventDispatcher를 has-a 확장을 감행한다음 만들어진 클래스가 EventDispatcher의 기능을 수행한다는 것을 명시적으로 외부에 알려주고 내부적으로 구현시켜주기 위해 IEventDispatcher 인터페이스를 implements 해준다. 이렇게 하면 원하는 기능인 ProxyObject와 EventDispatcher의 기능을 전부 수행하면서도 다중상속의 문제를 극복할 수 있다.
  • ex)
    public class MyProxyObject extends ProxyObject implements IEventDispatcher
    {
      var evnetDispatcher:EventDispatcher = new EventDispatcher();
     
      //내부적으로 IEventDispatcher에 선언한 메소드를 구현한다.  가령…
      public function dispatchEvent( event:Event ):Boolean
      {
         return  eventDispatcher.dispatchEvent( event );
      }
    }

13. preventDefault()와 stopPropagation(), stopImmediatePropagation()의 근본적 차이점은 무엇인가?


  • preventDefault()는 기본 동작(dafault behaviors)를 취소하는데 쓰이는 메소드인 반면 stopPropagation(), stopImmediatePropagation()는 이벤트 전파에만 영향을 준다.

  • preventDefault()가 사용 가능한지는 isDefaultPrevented() 메소드로 알 수 있다.

14. preventDefault()를 호출해서 실행을 가능하게 하기 위한 조건은 무엇인가?

  • 이벤트 객체를 생성시 cancelable속성이 true로 설정되어 있어야 한다.

15. 커스텀 이벤트를 만들어야하는 어떤 경우이며 어떻게 만드는가?

  • 커스텀 이벤트는 기본 이벤트 클래스(flash.events.Event) 또는 그 상위 이벤트 클래스를 확장하는 경우를 의미한다.
  • 이벤트를 확장해야하는 경우는 이벤트 송출시에 필요한 정보를 담아내기 위함이다.
  • 만드는 방법
    class MyEvent extends Event
    {
      public static const MY_EVENT:String = “myevent”;
      public var value:String;
      public function MyEvent( type:String, value:String ):void
      {
         super( type, false, false );
         this.value = value;
      }
      overide public function clone():Event
      {
        return new MyEvent( type, value );
      }
    }

16. 커스텀 이벤트가 bubbling이 가능하기 위해 어떤 조건이 필요한가?

  • Event의 생성자의 2번째 인자인 bubble값을 true로 설정한다.

17. 커스텀 컴포넌트 만들때 clone()함수를 override해야하는 이유는 무엇인가?

  • clone()메소드는 기존과 신규 properties들을 clone 내로 설정해 이벤트 객체의 복사본을 돌려준다.
    clone() 메소드를 Event 클래스 확장시 오버라이드 해야하는 이유는 이벤트를 다시 재전달해야하는 경우 묵시적으로 복사해서 재전달할 필요가 있을때 필요하기 때문이다.

  • 참고로 toString()도 확장해서 사용하는 것이 좋다. 이벤트에 대한 명세서가 될 수 있기 때문이다.

18. 약참조에 대해서 GC(가비지 콜렉션)과 관련되어 설명하라.

  • addEventListener()함수로 이벤트 청취자를 등록할때 5번째 인자로 useWeakReference 인자가 있다. 이것을 true로 설정하면 이벤트 청취자가 이벤트 청취를 약참조를 하겠다는 의미이다. 반대로 false(기본)이면 강참조이다.
  • 약참조, 강참조를 설명하기 전에 가비지 콜렉션(GC, Garbage Collection)에 대해서 먼저 알아야한다.
    만들어졌던 객체가 더이상 쓸모가 없어졌을때 GC라고 한다. 쓸모가 없어졌다는 것은 참조의 고리가 끊어졌다는 것을 의미한다. 메모리에 상주해 있지만 조만간 메모리에서 없애야할 대상인 것이다. Flash Player는 GC로 선정된 객체들을 메모리에서 삭제하는 시점을 내부적으로 구현해놓고 있다.(많은 분들이 Flash Player GC처리를 못한다고 하지만 실제로는 문제없이 잘하고 있다. 단지 효율적으로 GC처리를 하는지는 의문이지만…)
    Flash Player GC 대상을 찾아내기 위한 방법은 2가지가 있다. 그것은 레퍼런스 카운팅(reference counting)과 마크 앤 스윕(Mark and Sweep)이다. 레퍼런스 카운팅은 생성된 객체가 참조할때마다 참조 카운트를 1씩 더해준다. 또 참조에서 끊어지는 경우 1씩 감소시켜준다. 만약 레퍼런스 카운팅 값이 0이되는 경우 바로 GC 대상이 되는 것이다. 마크 앤 스윕은 레퍼런스 카운팅 만으로 찾을 수 없는 GC대상을 찾아준다. 가령, 두개 이상의 객체가 서로 다른 객체를 참조하고 있다고 가정한다.(순환참조) 그럼 이들 레퍼런스 카운팅 값은 1 이상이다. 그러므로 레퍼런스 카운팅 방법으로는 GC대상을 만들 수 없다. 마크 앤 스윕은  이들 객체가 최상위 부모와 연결되어 있는지 검사하는 방법이다. 부모로 부터 꼬리에 꼬리를 물고 객체가 참조되어 있는 것인지 조사해나가는 방법으로 GC대상을 검색한다.
    레퍼런스 카운팅과 마크앤 스윕 방법으로 찾아낸 GC대상은 메모리에 상주되지만 Flash Player의 GC 삭제방법 로직에 의해 어느 순간 삭제된다.(이 시점은 프로그래머가 어찌할 수 없다. AIR 또는 Flash Player Debug버전의 경우에만 System.gc()를 이용해 강제적으로 GC를 메모리에서 삭제할 수 있긴 하다.)
  • addEventListener()의 useWeakReference를 true로 설정하면 약참조가 되어 레퍼런스 카운팅을 증가시키지 않는다. 강참조의 경우 이벤트 대상(target)의 참조를 지웠다고 해도 addEventListener로 등록한 청취자 메소드가 GC대상이 아니라면 이벤트 대상의 레퍼런스 카운팅 값은 0이 될 수 없다. 결국 프로그래머의 뜻과 다르게 메모리를 낭비하는 일을 초래할 수 있다. 물론 이벤트 대상이 사라지는 시점에 removeEventListener() 사용하면 되겠지만 때로는 그 시점을 모르는 경우도 발생한다. 이러한 경우 useWeakReference를 true로 설정해서 메모리 낭비를 없앨 수 있겠다.
  • Flex에서 List 계열의 컴포넌트를 살펴보면 dataProvider()에 ArrayCollection 객체를 받을때 ArrayCollection의 변화를 살펴보기 위해 addEventListener()를 사용한다. 그런데 ArrayCollection 객체는 언제 어떻게 될지 List 계열 컴포넌트는 알 수 없을 것이다. 이때 유용하게 사용하는 것이 바로 useWeakReference=true로 설정해서 필요없어진 ArrayCollection이 메모리 남는 것을 방지할 수 있다. 참고 : http://blog.jidolstar.com/375


19. 이벤트가 전파되는 중간에 전파를 멈추게 하기 위해 stopPropagation()을 사용하지 않고removeEventListener() 를 사용하면 안되는 이유를 설명하라. (힌트, ActionScript 3.0의 Native 메커니즘에 입각한다. http://bixworld.egloos.com/2149717)


  • 이벤트 송출을 시작하면 flash player는 이벤트가 송출될 디스플레이 객체 리스트를 전부 조사해 미리 이벤트 객체를 복사해두기 때문이다. 이미 전파할 대상이 모두 정해져있고 전파가 시행중인 경우에는 중간에 removeEventLisener를 사용하더라도 일단 송출된 이벤트는 끝까지 전파된다. 다음 시점 이벤트 송출시에는 removeEventLisener()가 적용되어 있는 상태가 된다.


20. willTrigger()와 hasEventListener()의 의미를 설명하고와 두 메소드의 차이점을 보여줄 수 있는 대한 예를 들어보자.


  • 공통점
    hasEventListener()이나 willTrigger() 모두 이벤트 청취자가 있는지 검사한다.
  • 차이점
    hasEventListener() : 지정한 객체에(만) 이벤트 청취자가 있는지 조사한다. 이벤트 흐름과는 무관하다.
    willTrigger() : 지정한 객체를 포함하는 디스플레이 객체 리스트에 해당 이벤트가 청취자가 있는지 조사한다. 그러므로 이벤트 흐름과 관련 있다.
  • 예제
    var button:Sprite = new Sprite();
    addChild( button );
    this.addEventListener( MouseEvent.CLICK, onClick );
    trace( button.willTrigger( MouseEvent.CLICK ) ); //true
    trace( button.hasEventListener( MouseEvent.CLICK ) ); //false ->왜 false가 되는가 아는게 중요!
    trace( this.willTrigger( MouseEvent.CLICK ) ); //true
    trace( this.hasEventListener( MouseEvent.CLICK ) ); //true
  • 이 두개의 함수를 잘 활용하면 쓸데없이 이벤트를 송출하는 경우를 방지할 수 있다.

21. ActionScript 3.0 이벤트에 대해 참고할 만한 문헌 및 자료를 조사하자.

AND

출처: http://nomasumer.egloos.com/9328413

자바스크립트 정규표현식(JavaScript Regular Expression)

정규 표현식(Regular Expression) 이란?

문자열에서 특정한 캐릭터 조합(character combination)을 찾아내기위한 패턴(pattern)입니다.
특정 문자나 문자열로 문자열을 다루는 것에 문자뿐 만이 아니고 특수 문자로 다룰 수 있고 이들을 조합하여 다룰 수 있는 조건식(pattern)을 제공하여 더 세밀한 방법으로 문자들을 검색할 수 있게 합니다.

정규 표현식(Regular Expression) 생성 방법
1. object initializers를 사용한 방법
정규표현 =/패턴설정/[i/g/gi] var re = /ab+c/i
2. RegExp 객체의 constructor function를 사용한 방법
new RegExp("패턴 설정"[, "i", | ,"g", | "gi"]) var re = new RegExp("ab+c", "i")
정규 표현식(Regular Expression) 플래그 구성 요소(생략 가능)
g 완전일치(발생할 모든 pattern에 대한 전역 검색)
i 대/소문자 무시
gi 대/소문자 무시하고 완전 일치

정규 표현식(Regular Expression) 과 함께 사용하는 함수들
Method Type 설명
exec() RegExp 문장에서 매치를 위해 검색을 수행하는 정규 표현식 메소드
배열을 리턴
지정된 패턴과 같은 패턴을 찾는다.
test() RegExp 문장에서 매치를 위해 테스트하는 정규표현식 메소드
True 또는 False 리턴
같은 패턴이 있는지 테스트 한다.
match() String 문장에서 매치를 위해 검색을 수행하는 string 메소드
배열 또는 null 문자 리턴
지정된 패턴과 동일한 패턴을 찾는다.
search() String 문장에서 매치를 위해 테스트하는 string 메소드
목차나 -1 리턴
첫번째로 일치하는 부분 문자열의 위치를 반환합니다
replace() String 문장에서 매치를 위해 검색을 실행 문장을 대체하는 String 메소드
지정된 패턴과 바꾼다.
split() String 문장에서 매치하는 부분을 배열에 할당하는 String 메소드
지정된 패턴부분에서 문자열을 나눈다.

정규 표현식에서 사용하는 특수문자
문자 설명
다음에 나오는 특수 문자를 문자열로 인식
예 : \' 시퀀스는 ""를 찾고 '/'는 "/"를 찾습니다.
^ 입력 문자열의 시작 위치를 찾습니다.(라인의 처음과 패턴과 찾습니다.)
가령, ^A 라고 써주면 검색하고자 하는 문장의 시작문자가 A인지를 검사하는 것입니다.
$ 입력 문자열의 끝 위치를 찾습니다.(라인의 끝과 패턴과 찾습니다.)
가령, $A 라고 써주면 검색하고자 하는 문장의 마지막문자가 A인지를 검사하는 것입니다.
* 0개 이상의 문자와 찾습니다.( 모든것이라는 의미 ==> {0,} 같은 의미 )
예 : "cg*"는 "c", "cginjs" 등입니다.
+ 1개 이상의 문자와 찾습니다.( {1,} 같은 의미임. )
예 : "cg+"는 "cg", "cginjs" 등이지만 "c"는 아닙니다.
? 0 또는 1개의 문자 의미.( {0,1} 같은 의미임. )
예 : " C?j" 라면 C라는 문자와 j라는 문자사이에 문자가 0개 또는 1개 가 들어갈 수 있다는 말입니다.
      Cj, Cnj, Cgj등과 같은..
. "n"을 제외한 모든 단일 문자를 찾습니다.
"n"을 포함한 모든 문자를 찾으려면 '[.n]' 패턴을 사용하십시오.
() 한번 match를 수행해서 나온 결과를 기억함.
예 : /(cnj)/ 는 cnj라는 단어를 검색한 후, 그 단어를 배열등과 같은 저장장소에 남겨두어 나중에 다시 호출할 수 있도록 합니다.
| OR
{n} 정확히 n개의 문자(n은 음이 아닌 정수)
예: a{2} 는 a 문자 두 개, 즉, aa를 의미합니다.
{n,} n정확히 n개 찾습니다.(n,음이 아닌 정수)
예 : "c{2}"는 "cnj"의 "c"는 찾지 않지만 "bcccccccccf"의 모든 c는 찾습니다.
{n,m} 최소 n개, 최대 m개 찾습니다.(n은 음이 아닌 정수)
예 : "b{1,4}"은 "bcccccccccf"의 처음 네 개의 c를 찾습니다.
쉼표와 숫자 사이에는 공백을 넣을 수 없습니다.
[xyz] 괄호 안의 문자 중 하나를 찾습니다.(문자들의 set를 의미)
가령, [a-z]라면 a부터 z까지의 모든 문자와 찾습니다.하는 것으로 []안의 -는 범위를 나타냅니다.
괄호 안의 문자 중 하나를 찾습니다.
예:, "[abc]"는 "cnj"의 "c"를 찾습니다.
[^xyz] 제외 문자 집합입니다.(네가티브(-) 캐릭터 셋)
괄호 밖의 문자 중 하나를 찾습니다.
예 : "[^abc]"는 "acn"의 "n"를 찾습니다.
x|y x 또는 y를 찾습니다.
예 : "c|cginjs"는 "c" 또는 "cginjs"를 찾습니다.
[a-z] 문자 범위입니다.(지정한 범위 안의 문자를 찾습니다)
예 : "[a-z]"는 "a"부터 "z" 사이의 모든 소문자를 찾습니다.
[^a-z] 제외 문자 범위입니다(지정된 범위 밖의 문자를 찾습니다)
예 : "[^a-z]"는 "a"부터 "z" 사이에 없는 모든 문자를 찾습니다.
[b] 백스페이스와 찾습니다.
b 단어와 공백 사이의 위치를 찾습니다.(단어의 경계)
예 : "erb"는 "never"의 "er"는 찾지만 "verb"의 "er"는 찾지 않습니다.
B 단어의 비경계를 찾습니다.
예 : "erB"는 "verb"의 "er"는 찾지만 "never"의 "er"는 찾지 않습니다.
cX X 가 나타내는 제어 문자를 찾습니다.(control 문자와 찾습니다)
예 : cM은 Control-M 즉, 캐리지 리턴 문자를 찾습니다.
      x 값은 A-Z 또는 a-z의 범위 안에 있어야 합니다.
      그렇지 않으면 c는 리터럴 "c" 문자로 간주됩니다.
d 0부터 9까지의 아라비아 숫자와 찾습니다.. [0-9]과 같은 의미
D 비숫자 문자를 찾습니다. [^0-9]와 같습니다.
f 폼피드 문자(form-feed)를 찾습니다.(x0c와 cL과 같은 의미)
n linefeed(줄 바꿈 문자)를 찾습니다.(x0a와 cJ과 같은 의미)
r 캐리지 리턴 문자를 찾습니다(x0d와 cM과 같은 의미)
s 공백, 탭, 폼피드 등의 공백을 찾습니다.( [ tnrfv]과 같은 의미)
S s가 아닌 문자(공백이 아닌 문자)를 찾습니다. ( [^ tnrfv]과 같은 의미)
t 탭 문자를 찾습니다. (x09와 cI와 같은 의미)
v 수직 탭 문자를 찾습니다.(x0b와 cK와 같은 의미)
w 밑줄을 포함한 모든 단어 문자를 찾습니다.( "[A-Za-z0-9_]"와 같은 의미)
W 문자가 아닌 요소,
즉 % 등과 같은 특수 문자를 의미함( "[^A-Za-z0-9_]"와 같은 의미)
n n은 마지막 일치하는 문장
xn n을 찾습니다. 여기서 n은 16진수 이스케이프 값입니다.
16진수 이스케이프 값은 정확히 두 자리여야 합니다.
예 : 'x41'은 "A"를 찾고 'x041'은 'x04'와 "1"과 같습니다.
       정규식에서 ASCII 코드를 사용할 수 있습니다.
num num을 찾습니다.(num은 양의 정수)
캡처한 문자열에 대한 역참조입니다.
예 : '(.)1'은 연속적으로 나오는 동일한 문자 두 개를 찾습니다.
nm 8진수 이스케이프 값이나 역참조를 나타냅니다.
nm 앞에 최소한 nm개의 캡처된 부분식이 나왔다면 nm은 역참조입니다.
nm 앞에 최소한 n개의 캡처가 나왔다면 n은 역참조이고 뒤에는 리터럴 m이 옵니다.
이 두 경우가 아닐 때 n과 m이 0에서 7 사이의 8진수이면 nm은 8진수 이스케이프 값 nm을 찾습니다.
nml n이 0에서 3 사이의 8진수이고 m과 l이 0에서 7 사이의 8진수면 8진수 이스케이프 값 nml을 찾습니다.
un n은 4 자리의 16진수로 표현된 유니코드 문자입니다.
예 : u00A9는 저작권 기호(ⓒ)를 찾습니다.
ooctal
xhex
8(octal)진수, 10(hex)진수 값

정규 표현식에서 사용하는 property
속성 설명
global 완전 일치
ignoreCase 대문자 소문자 무시
lastIndex 다음 패턴조회를 시작하는 위치
source 조회시킬 패턴
input 검색 문자열의 설정, 변경($_로도 가능)
multiline 줄바구기 코드를 무시할지 여부($_로도 가능)
참(무시하지 않는다), 거짓(무시한다.)로 설정
lastMatch 패턴 조회한 최후의 문자($&로도 가능)
lastParen 패턴 조회한 최후의 substring($+로도 가능)
leftContext 패턴 조회한 값의 앞의 문자($¥Q로도 가능)
rightContext 패턴 조회한 값의 다음 문자($'로도 가능)
$1~$9 패턴 조회한 것의 일부를 저장한다.(9개까지

정규 표현식(Regular Expression) 사용예제 1

  1. <SCRIPT LANGUAGE="JavaScript">
  2. <!--
  3. function cnj_regexp() {
  4. // 'c' 가 있는 문자열이 있으면 TRUE (대/소문자 구분)
  5. var cnj_re = /c/
  6. var cnj_ment = "'c' 가 있는 문자열이 있으면 TRUE (대/소문자 구분)nn변수 : " + cnj_re;
  7. if (cnj_re.test("When Cgi Met Javascript = CginJs.Com") == true) {
  8. alert(cnj_ment + "nn문자열이 있군요(true)");
  9. } else {
  10. alert(cnj_ment + "nn문자열이 없군요(fail)");
  11. }
  12. }
  13. //-->
  14. </SCRIPT>
  15. <input type="button" name="cnj_text" value="확인" omClick="cnj_regexp()">

정규 표현식(Regular Expression) 사용예제 2

  1. <SCRIPT LANGUAGE="JavaScript">
  2. <!--
  3. function cnj_regexp() {
  4. // 'CGINJS' 가 있는 문자열이 있으면 TRUE (대/소문자 구분)
  5. var cnj_re = /CGINJS/
  6. var cnj_ment = "'CGINJS' 가 있는 문자열이 있으면 TRUE (대/소문자 구분)nn변수 : " + cnj_re;
  7. if (cnj_re.test("When Cgi Met Javascript = CginJs.Com") == true) {
  8. alert(cnj_ment + "nn문자열이 있군요(true)");
  9. } else {
  10. alert(cnj_ment + "nn문자열이 없군요(fail)");
  11. }
  12. }
  13. //-->
  14. </SCRIPT>
  15. <input type="button" name="cnj_text" value="확인" omClick="cnj_regexp()">


정규 표현식(Regular Expression) 사용예제 3

  1. <SCRIPT LANGUAGE="JavaScript">
  2. <!--
  3. function cnj_regexp() {
  4. // 대소문자 구분없이 해당 문자 또는 문자열을 검색할 경우 끝에 i 를 붙인다.
  5. // 'cginjs' 또는'CGINJS' 가 있는 문자열 모두가 있으면 TRUE (대/소문자 구분)
  6. var cnj_re = /CGINJS/i
  7. var cnj_ment = "'cginjs' 또는 'CGINJS' 가 있는 문자열 모두가 있으면 TRUE (대/소문자 구분)nn변수 : " + cnj_re;
  8. if (cnj_re.test("When Cgi Met Javascript = CginJs.Com") == true) {
  9. alert(cnj_ment + "nn문자열이 있군요(true)");
  10. } else {
  11. alert(cnj_ment + "nn문자열이 없군요(fail)");
  12. }
  13. }
  14. //-->
  15. </SCRIPT>
  16. <input type="button" name="cnj_text" value="확인" omClick="cnj_regexp()">

정규 표현식(Regular Expression) 사용예제 4

  1. <SCRIPT LANGUAGE="JavaScript">
  2. <!--
  3. function cnj_regexp() {
  4. // 여러개의 이어지는 내용들을 검색할 경우는 '-' 를 넣어 표현한다.
  5. // 'a' 에서 'z' 까지중 하나만 있으면 모두가 TRUE (대소문자 구분)
  6. var cnj_re = /[a-z]/
  7. var cnj_ment = "'a' 에서 'z' 까지중 하나만 있으면 모두가 TRUE (대소문자 구분)nn변수 : " + cnj_re;
  8. if (cnj_re.test("When Cgi Met Javascript = CginJs.Com") == true) {
  9. alert(cnj_ment + "nn문자열이 있군요(true)");
  10. } else {
  11. alert(cnj_ment + "nn문자열이 없군요(fail)");
  12. }
  13. }
  14. //-->
  15. </SCRIPT>
  16. <input type="button" name="cnj_text" value="확인" omClick="cnj_regexp()">

정규 표현식(Regular Expression) 사용예제 5

  1. <SCRIPT LANGUAGE="JavaScript">
  2. <!--
  3. function cnj_regexp() {
  4. // | 는 OR 같은 의미
  5. // 여러가지의 문자 또는 문자열을 검색할 경우 '|' 이용
  6. // 'x' 또는 'y' 또는 'z' 가 있는 문자열 모두가 TRUE (대소문자 구분)
  7. var cnj_re = /x|y|z/
  8. var cnj_ment = "'x' 또는 'y' 또는 'z' 가 있는 문자열 모두가 TRUE (대소문자 구분)nn변수 : " + cnj_re;
  9. if (cnj_re.test("When Cgi Met Javascript = CginJs.Com") == true) {
  10. alert(cnj_ment + "nn문자열이 있군요(true)");
  11. } else {
  12. alert(cnj_ment + "nn문자열이 없군요(fail)");
  13. }
  14. }
  15. //-->
  16. </SCRIPT>
  17. <input type="button" name="cnj_text" value="확인" omClick="cnj_regexp()">

정규 표현식(Regular Expression) 사용예제 6

  1. <SCRIPT LANGUAGE="JavaScript">
  2. <!--
  3. function cnj_regexp() {
  4. // | 는 OR 같은 의미
  5. // 여러가지의 문자 또는 문자열을 검색할 경우 '|' 이용
  6. // 'a' 에서 'z' 까지 또는 '0' 에서 '9' 까지중 하나만 있으면 모두가 TRUE (대소문자 구분)
  7. var cnj_re = /[a-z]|[0-9]/
  8. var cnj_ment = "'a' 에서 'z' 까지 또는 '0' 에서 '9' 까지중 하나만 있으면 모두가 TRUE (대소문자 구분)nn변수 : " + cnj_re;
  9. if (cnj_re.test("When Cgi Met Javascript = CginJs.Com") == true) {
  10. alert(cnj_ment + "nn문자열이 있군요(true)");
  11. } else {
  12. alert(cnj_ment + "nn문자열이 없군요(fail)");
  13. }
  14. }
  15. //-->
  16. </SCRIPT>
  17. <input type="button" name="cnj_text" value="확인" omClick="cnj_regexp()">

정규 표현식(Regular Expression) 사용예제 7

  1. <SCRIPT LANGUAGE="JavaScript">
  2. <!--
  3. function cnj_regexp() {
  4. // 해당 문자또는 문자열이 없는 경우를 검색할 경우 브래킷('[', ']') 안에 '^' 를 넣는다.
  5. // 'a' 에서 'z' 까지의 문자가 아닌 문자가 있을 경우 TRUE (대소문자 구분)
  6. var cnj_re = /[^a-z]/
  7. var cnj_ment = "'a' 에서 'z' 까지의 문자가 아닌 문자가 있을 경우 TRUE (대소문자 구분)nn변수 : " + cnj_re;
  8. if (cnj_re.test("When Cgi Met Javascript = CginJs.Com") == true) {
  9. alert(cnj_ment + "nn문자열이 있군요(true)");
  10. } else {
  11. alert(cnj_ment + "nn문자열이 없군요(fail)");
  12. }
  13. }
  14. //-->
  15. </SCRIPT>
  16. <input type="button" name="cnj_text" value="확인" omClick="cnj_regexp()">

정규 표현식(Regular Expression) 사용예제 8

  1. <SCRIPT LANGUAGE="JavaScript">
  2. <!--
  3. function cnj_regexp() {
  4. // 문자열의 첫번째 글자가 일치해야할 경우는 '^' 를 브래킷('[', ']') 밖에 넣는다
  5. // 'a' 에서 'z' 까지의 문자로 시작하는 문자열일 겨우 TRUE (대소문자 구분)
  6. var cnj_re = /^[a-z]/
  7. var cnj_ment = "'a' 에서 'z' 까지의 문자로 시작하는 문자열일 겨우 TRUE (대소문자 구분)nn변수 : " + cnj_re;
  8. if (cnj_re.test("When Cgi Met Javascript = CginJs.Com") == true) {
  9. alert(cnj_ment + "nn문자열이 있군요(true)");
  10. } else {
  11. alert(cnj_ment + "nn문자열이 없군요(fail)");
  12. }
  13. }
  14. //-->
  15. </SCRIPT>
  16. <input type="button" name="cnj_text" value="확인" omClick="cnj_regexp()">

정규 표현식(Regular Expression) 사용예제 9

  1. <SCRIPT LANGUAGE="JavaScript">
  2. <!--
  3. function cnj_regexp() {
  4. // 문자열의 끝쪽 글자가 해당 문자 또는 문자열과 일치해야할 경우는 '$' 를 넣는다.
  5. // 'a' 에서 'z' 까지의 문자로 끝나는 문자열일 겨우 TRUE (대소문자 구분)
  6. var cnj_re = /[a-z]$/
  7. var cnj_ment = "'a' 에서 'z' 까지의 문자로 끝나는 문자열일 겨우 TRUE (대소문자 구분)nn변수 : " + cnj_re;
  8. if (cnj_re.test("When Cgi Met Javascript = CginJs.Com") == true) {
  9. alert(cnj_ment + "nn문자열이 있군요(true)");
  10. } else {
  11. alert(cnj_ment + "nn문자열이 없군요(fail)");
  12. }
  13. }
  14. //-->
  15. </SCRIPT>
  16. <input type="button" name="cnj_text" value="확인" omClick="cnj_regexp()">

 정규 표현식(Regular Expression) 사용예제 10

  1. <SCRIPT LANGUAGE="JavaScript">
  2. <!--
  3. function cnj_regexp() {
  4. // 특수문자('', '^', '$', '*', '+', '?', '.', '(', ')', '|', '{', '}', '[', ']')를 검색할 경우는 '' 를 넣는다.
  5. // '' 가 있는 문자열일 겨우 TRUE (대소문자 구분)
  6. var cnj_re = /\/
  7. var cnj_ment = "'' 가 있는 문자열일 겨우 TRUE (대소문자 구분)nn변수 : " + cnj_re;
  8. if (cnj_re.test("When Cgi Met Javascript = CginJs.Com") == true) {
  9. alert(cnj_ment + "nn문자열이 있군요(true)");
  10. } else {
  11. alert(cnj_ment + "nn문자열이 없군요(fail)");
  12. }
  13. }
  14. //-->
  15. </SCRIPT>
  16. <input type="button" name="cnj_text" value="확인" omClick="cnj_regexp()">
AND